GNU Wget is a free command-line utility for downloading files from the Web. It supports standard web protocols like HTTP, HTTPS, and FTP, as well as retrieval data through HTTP proxies. Wget is a non-interactive command, which means no user login is required and can be run in the background.
Wget follows the links in the HTML and CSS pages and works recursively. Which makes it smart for cloning remote websites and running on the local machines. This is sometimes referred to as “recursive downloading.”
How to Install Wget
Generally, the Wget package is pre-installed on Linux distributions. But in some cases of minimal installations, It may not be installed.
Open a terminal and execute the following commands to install or upgrade the Wget package from the default package manager.
- On Ubuntu, Debian & Linux Mint Systems
sudo apt update && apt install wget -y - On CentOS, RHEL & Fedora Systems
sudo dnf install wget -y
Wget Command Syntax
A simple Wget command follows the below syntax.
wget [option]... [URL]...A large number of command-line options make it more usable. Wget uses GNU getopt to process command-line arguments, which means all options have a long-form along with a short one.
Wget required a URL to an archive, IOS, or webpage to download.
Wget Command Examples
Here are some frequently used wget commands with examples.
1. Downloading a File Using Wget
Open a terminal and type wget followed by the remote file URL to download on the local machine. No additional parameters are required to download a file.
wget https://wordpress.org/latest.zip The above command will download the file in the current working directory. The filename will remain the same in the local system as on the remote machine.
2. Download File with a New Name
Default wget downloads the file with the same name on the local system. Use -O (Capital O) command-line option followed by a new name to write file on local system.
wget -O local.zip https://wordpress.org/latest.zip See the below screenshot, showing the local file is created with a new name.
3. Download Large Files with Resume Option
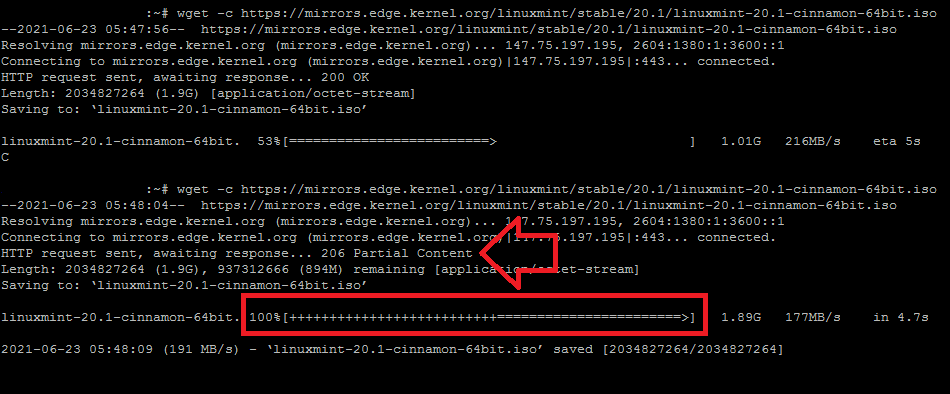
The Wget allows us to resume download for a partially downloaded file. It is helpful for downloading large files from remote. In any case, the download interrupts, can be resumed to download remaining content only instead of full download.
Use -c or --continue switch with the file.
wget -c //mirrors.edge.kernel.org/linuxmint/stable/20.1/linuxmint-20.1-cinnamon-64bit.isop See the below example, Downloading a large file with -c option. In the first attempt, once the downloading started killed the download process with CTRL+C. Now again execute the same command and you can see the downloading resumes.
4. Wget to Execute Remote Scripts without Creating Local File
Wget is also widely used for executing remote scripts through scheduled jobs like crontab. But we found that it creates a new file with each run under the home directory. We can instruct wget to redirect all content to /dev/null and ignore creating files.
wget -q -O /dev/null https://www.mytechmint.com Here -q will suppress all the output on-screen and -O will redirect all the content to /dev/null file.
5. How to Mirror a Website in Wget
Wget allows us to download website content recursively. It follows the internal links available in HTML content. Use --recursive option with wget command to download the entire site in your local system.
wget --recursive https://www.mytechmint.com You can also set the maximum depth for recursion with -l option.
wget --recursive -l 2 https://www.mytechmint.com The above commands will create a directory with the same name to the domain in the current directory and place all files under it.
6. How to Authorize Requests with User and Password
Most of the files over remote FTP servers are secured with authentication. In some cases, content over the HTTP can be secured with authentication. Wget allows us to pass authentication details with this request.
wget --user=USER --password=PASS https://www.mytechmint.com/backup.zip You can use --user and --password for both FTP and HTTP authentications.
In this tutorial, you have learned about the Linux wget command with examples. Feel free to use the comment section in case of any query.


