Introduction to PySpark Map Function
PySpark MAP is a transformation in PySpark that is applied over each and every function of an RDD / Data Frame in a Spark Application. The return type is a new RDD or data frame where the Map function is applied. It is used to apply operations over every element in a PySpark application like transformation, an update of the column, etc.
The Map operation is a simple spark transformation that takes up one element of the Data Frame / RDD and applies the given transformation logic to it. We can define our own custom transformation logic or the derived function from the library and apply it using the map function. The result returned will be a new RDD having the same number of elements as the older one.
Syntax of PySpark Map Function
The syntax for PySpark Map function is:
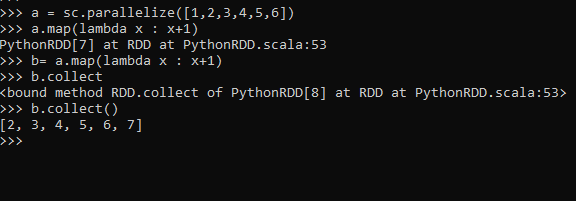
a.map (lambda x : x+1)Screenshot:
Explanation:
- a: The Data Frame or RDD.
- Map: Map Transformation to be applied.
- Lambda: The function to be applied for.
Working of PySpark Map Function
Let us see somehow the MAP function works in PySpark:-
The Map Transformation applies to each and every element of an RDD / Data Frame in PySpark. This transforms a length of RDD of size L into another length L with the logic applied to it. So the input and output will have the same record as expected.
The transformation basically iterates through all the elements and applies the logic that has been given over the function. Post applying the logic to each and every element the result is returned back as a new RDD / Data Frame in PySpark. We can have our own custom logic that we need to apply to the elements but the thing that needs to be clear is the logic is applied to every element that is present in the RDD or Data Frame.
Examples of PySpark Map Function
Let us see some examples of how the PySpark Map function works:
Let us first create a PySpark RDD.
A very simple way of doing this can be using sc. parallelize function.
a = sc.parallelize([1,2,3,4,5,6])This will create an RDD where we can apply the map function over defining the custom logic to it.
Let’s try to define a simple function to add 1 to each element in an RDD and pass this with the Map function to every RDD in our PySpark application.
We will start with writing a lambda function for the addition and passing it inside the Map function over the RDD.
b= a.map(lambda x : x+1)This will add 1 to every element in RDD and the result will be stored in a new RDD.
The RDD.collect method will be used to collect and define the result further.
b.collect()Output :
This simple example shows how the map operation can be applied to all the elements in a PySpark RDD.
Let’s try to check one example counting the number of words in a PySpark RDD with the map function by using a complex RDD function.
We will start by making a PySpark RDD.
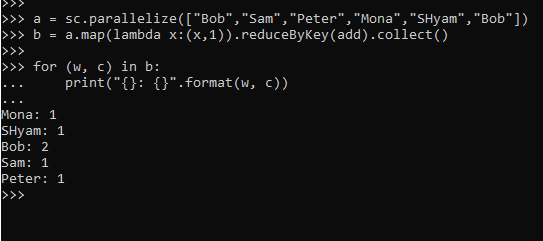
a = sc.parallelize(["Bob","Sam","Peter","Mona","SHyam","Bob"])The task will be to apply the Map function and count the occurrence of each word in it.
We will start this by assigning a value to each element and then post-assigning adding the value using the reduce by key operation over the RDD.
We will use the add function to import from the operator to perform the add operation over the RDD with the same key.
from operator import add
b = a.map(lambda x:(x,1)).reduceByKey(add).collect()
for (w, c) in b:
print("{}: {}".format(w, c))
This will print the output of the occurrence of all the words in a PySpark RDD.
Screenshot:
We can also sort the elements that have been collected post the Map operation using the sort by keyword over the RDD.
sort = b.sortBy(lambda x : x[1] , ascending = False)
sort.collect
This will output the sorted RDD.
Screenshot:


