My development implementation works, so I have progressed to using the cloud-hosted bitnami instance. This comes with public key access rather than password access. This actually makes it easier to connect.
- Download your private key, if using bitnami use the cloud console, if using AWS use the AWS console. Store it with no spaces in the file name.
- Verify that you can connect using PuTTY
- Download WinSCP
You now have two choices, you may use the SFTP protocol or the SCP protocol. My experience shows that connecting with SCP is easier using the below two methods.
- Use the SCP Protocol
- Use the SFTP Protocol
Use the SCP Protocol
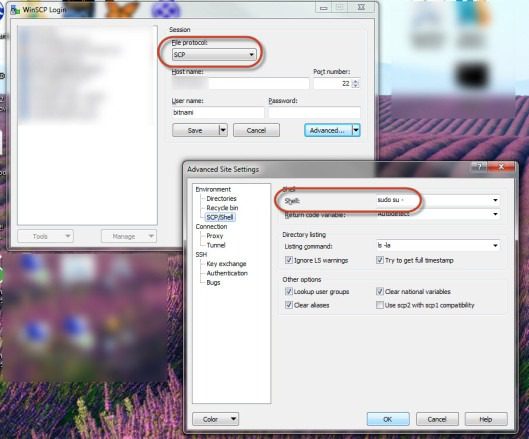
- Test connecting with WinSCP using the SCP protocol and the bitnami (low privileged user) and your private key.
- On the Advanced tab of WinSCP specify the Shell to be
-
sudo su-
-
Use the SFTP Protocol
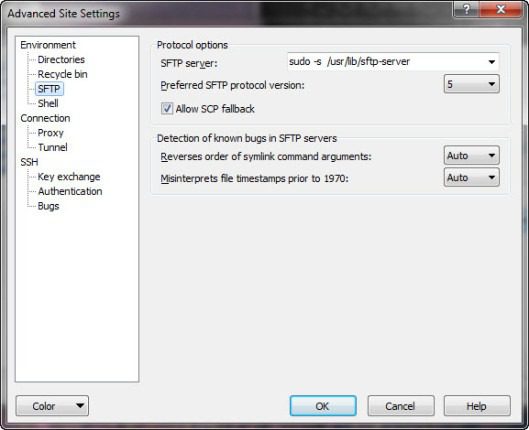
- Test connecting with WinSCP using the SFTP protocol using the bitnami (low privileged user) and your private key.
- Find the location of the SFTP server, you will enter this into WinSCP later
-
$ whereis sftp-server
-
- On the Advanced tab of the WinSCP specify the sudo -s command to run the server as su. This works because you are using PKI and are not asked to provide a password when you sudo.
- sudo -s /usr/lib/sftp-server
You should now be able to connect. 🤓


Thank you very much, only #2 method works for me.
thanks, sftp method helped me easily.