A User Form is a custom-built dialog box that makes a user data entry more controllable and easier to use for the user. In this chapter, you will learn to design a simple form and add data into excel.
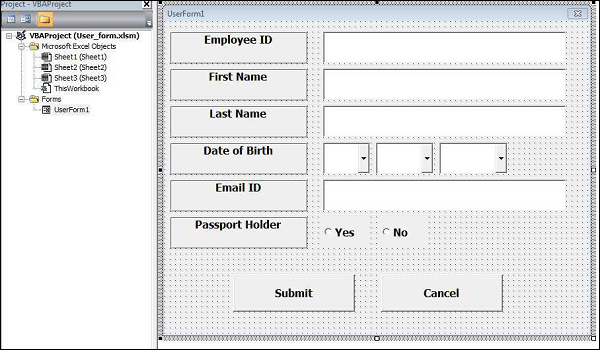
Step 1 − Navigate to VBA Window by pressing Alt+F11 and Navigate to “Insert” Menu and select “User Form”. Upon selecting, the user form is displayed as shown in the following screenshot.
Step 2 − Design the forms using the given controls.
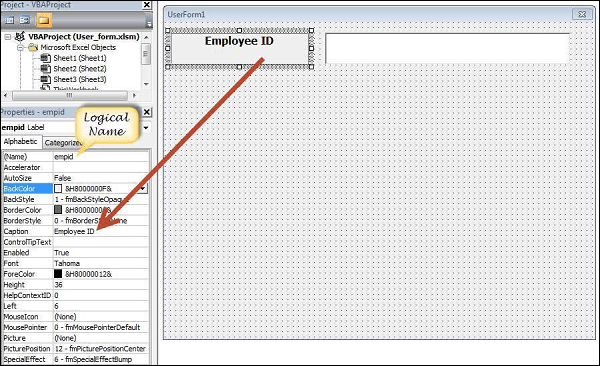
Step 3 − After adding each control, the controls have to be named. Caption corresponds to what appears on the form and name corresponds to the logical name that will be appearing when you write VBA code for that element.
Step 4 − Following are the names against each one of the added controls.
| Control | Logical Name | Caption |
|---|---|---|
| From | frmempform | Employee Form |
| Employee ID Label Box | empid | Employee ID |
| firstname Label Box | firstname | First Name |
| lastname Label Box | lastname | Last Name |
| dob Label Box | dob | Date of Birth |
| mailid Label Box | mailid | Email ID |
| Passportholder Label Box | Passportholder | Passport Holder |
| Emp ID Text Box | txtempid | NOT Applicable |
| First Name Text Box | txtfirstname | NOT Applicable |
| Last Name Text Box | txtlastname | NOT Applicable |
| Email ID Text Box | txtemailid | NOT Applicable |
| Date Combo Box | cmbdate | NOT Applicable |
| Month Combo Box | cmbmonth | NOT Applicable |
| Year Combo Box | cmbyear | NOT Applicable |
| Yes Radio Button | radioyes | Yes |
| No Radio Button | radiono | No |
| Submit Button | btnsubmit | Submit |
| Cancel Button | btncancel | Cancel |
Step 5 − Add the code for the form load event by performing a right-click on the form and selecting ‘View Code’.
Step 6 − Select ‘Userform’ from the objects drop-down and select ‘Initialize’ method as shown in the following screenshot.
Step 7 − Upon Loading the form, ensure that the text boxes are cleared, drop-down boxes are filled and Radio buttons are reset.
Private Sub UserForm_Initialize()
   'Empty Emp ID Text box and Set the Cursor
   txtempid.Value = ""
   txtempid.SetFocus'
Empty all other text box fields
   txtfirstname.Value = ""
   txtlastname.Value = ""
   txtemailid.Value = ""
'Clear All Date of Birth Related Fields
   cmbdate.Clear
   cmbmonth.Clear
   cmbyear.Clear'
Fill Date Drop Down box - Takes 1 to 31
   With cmbdate
      .AddItem "1"
      .AddItem "2"
      .AddItem "3"
      .AddItem "4"
      .AddItem "5"
      .AddItem "6"
      .AddItem "7"
      .AddItem "8"
      .AddItem "9"
      .AddItem "10"
      .AddItem "11"
      .AddItem "12"
      .AddItem "13"
      .AddItem "14"
      .AddItem "15"
      .AddItem "16"
      .AddItem "17"
      .AddItem "18"
      .AddItem "19"
      .AddItem "20"
      .AddItem "21"
      .AddItem "22"
      .AddItem "23"
      .AddItem "24"
      .AddItem "25"
      .AddItem "26"
      .AddItem "27"
      .AddItem "28"
      .AddItem "29"
      .AddItem "30"
      .AddItem "31"
   End With
'Fill Month Drop Down box - Takes Jan to Dec
   With cmbmonth
      .AddItem "JAN"
      .AddItem "FEB"
      .AddItem "MAR"
      .AddItem "APR"
      .AddItem "MAY"
      .AddItem "JUN"
      .AddItem "JUL"
      .AddItem "AUG"
      .AddItem "SEP"
      .AddItem "OCT"
      .AddItem "NOV"
      .AddItem "DEC"
   End With'
Fill Year Drop Down box - Takes 1980 to 2014
   With cmbyear
      .AddItem "1980"
      .AddItem "1981"
      .AddItem "1982"
      .AddItem "1983"
      .AddItem "1984"
      .AddItem "1985"
      .AddItem "1986"
      .AddItem "1987"
      .AddItem "1988"
      .AddItem "1989"
      .AddItem "1990"
      .AddItem "1991"
      .AddItem "1992"
      .AddItem "1993"
      .AddItem "1994"
      .AddItem "1995"
      .AddItem "1996"
      .AddItem "1997"
      .AddItem "1998"
      .AddItem "1999"
      .AddItem "2000"
      .AddItem "2001"
      .AddItem "2002"
      .AddItem "2003"
      .AddItem "2004"
      .AddItem "2005"
      .AddItem "2006"
      .AddItem "2007"
      .AddItem "2008"
      .AddItem "2009"
      .AddItem "2010"
      .AddItem "2011"
      .AddItem "2012"
      .AddItem "2013"
      .AddItem "2014"
   End With
'Reset Radio Button. Set it to False when form loads.
   radioyes.Value = False
   radiono.Value = False
End Sub
Step 8 − Now add the code to the Submit button. Upon clicking the submit button, the user should be able to add the values into the worksheet.
Private Sub btnsubmit_Click()
   Dim emptyRow As Long
'Make Sheet1 active
   Sheet1.Activate'
Determine emptyRow
   emptyRow = WorksheetFunction.CountA(Range("A:A")) + 1
'Transfer information'
   Cells(emptyRow, 1).Value = txtempid.Value
   Cells(emptyRow, 2).Value = txtfirstname.Value
   Cells(emptyRow, 3).Value = txtlastname.Value
   Cells(emptyRow, 4).Value = cmbdate.Value & "/" & cmbmonth.Value & "/" & cmbyear.Value
   Cells(emptyRow, 5).Value = txtemailid.Value
If radioyes.Value = True Then
Cells(emptyRow, 6).Value = "Yes"
Else
Cells(emptyRow, 6).Value = "No"
End If
End Sub
Step 9 − Add a method to close the form when the user clicks the Cancel button.
Private Sub btncancel_Click()
   Unload Me
End Sub
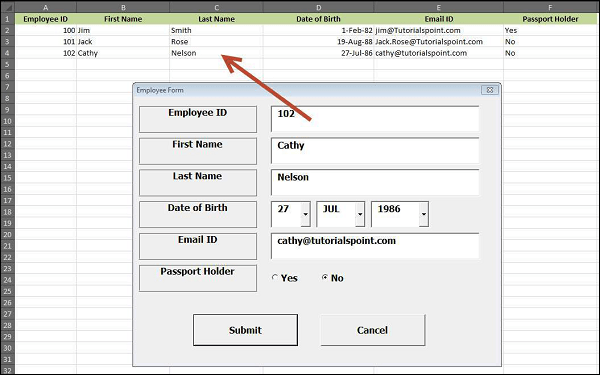
Step 10 − Execute the form by clicking the “Run” button. Enter the values into the form and click the ‘Submit’ button. Automatically the values will flow into the worksheet as shown in the following screenshot.


